Agriculture Soil Testing
Soil testing is critically necessary for evaluation of fertilizer needs of areas where corn is to be grown. Corn requires a higher soil pH and more nitrogen than most other crops. Maintaining an adequate soil pH and nitrogen supply is difficult in the South because the area in general has greater rainfall than the Corn Belt, and sandier soils, lowering the pH and leaching soluble nutrients from the root zone (Aldrich et al., 1975). Adjustments of soil pH with lime application should be made well in advance of planting, before the pH reaches critically low levels, because adjustment of pH due to liming is usually not effective during the same growing season it is applied, and the crop will have matured before breakdown of the lime can have any noticeable effect on the pH. Soil testing and subsequent preplant application of lime and fertilizer to alleviate deficiencies in pH, nitrogen, and other plant nutrients enable the grower to get his crop started with a minimum of the stresses that have been reported to predispose the crop to aflatoxin contamination (Jones and Duncan, 1981). Deficiencies of other major (phosphorus and potassium) and minor elements, as determined by soil test, can normally be remedied at planting by application of a complete fertilizer blended by commercial dealers especially for corn production.
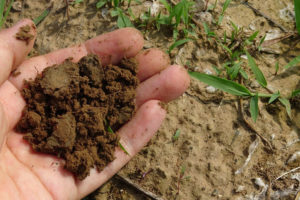
A soil sample must be taken at the right time and in the right way. The tools used, the area sampled, the depth and the correct mix of the sample, the information provided, and packaging all influence quality of the sample.
Soil Contaminants: -
Common mineral soil contaminants include arsenic, barium, cadmium, copper, mercury, lead, and zinc.
Lead is a particularly dangerous soil component. The following table from the University of Minnesota categorizes typical soil concentration levels and their associated health risks
Soil testing.
 Soil Test Recommendation
6 Steps to a successful soil sample :
- 1. Get a trowel and a bucket. Be sure neither is rusty or made of galvanized (zinc-coated) metal, which could skew your results.
- 2. Scrape mulch and leaf litter from the soil surface. Dig out a wedge of soil about 6 to 8 inches deep, and set this wedge aside.
- 3. Now dig out a half-inch piece of soil from the hole and pour it into your bucket.
- 4. Repeat steps 2 and 3 at least a half-dozen times in different parts of the farm or garden so that the soil sample represents your whole garden when mixed.
- 5. Use your trowel to mix the soil together thoroughly.
- 6. Fill the soil sample bag or container with the mixed soil, complete the paperwork and mail it all off to the lab.
-
Agricultural Testing Services: Soil Sampling
Plants require nutrients and an acceptable soil pH to grow well. Soil testing is the best way to find out how much lime and fertilizer to apply based on the crop and existing field conditions.
Soil Testing : -
Soil testing is often performed by commercial labs that offer a variety of tests, targeting groups of compounds and minerals. The advantages associated with local lab is that they are familiar with the chemistry of the soil in the area where the sample was taken. This enables technicians to recommend the tests that are most likely to reveal useful information.
Soil testing in progress
Laboratory tests often check for plant nutrients in three categories:
Major nutrients: nitrogen (N), phosphorus (P), and potassium (K)
Secondary nutrients: sulfur, calcium, magnesium
Minor nutrients: iron, manganese, copper, zinc, boron, molybdenum, chlorineThe amount of plant available soil phosphorus is most often measured with a chemical extraction method, and different countries have different standard methods. Just in Europe, more than 10 different soil P tests are currently in use and the results from these tests are not directly comparable with each other.[4]
Do-it-yourself kits usually only test for the three "major nutrients", and for soil acidity or pH level. Do-it-yourself kits are often sold at farming cooperatives, university labs, private labs, and some hardware and gardening stores. Electrical meters that measure pH, water content, and sometimes nutrient content of the soil are also available at many hardware stores. Laboratory tests are more accurate than tests with do-it-yourself kits and electrical meters. Here is an example soil sample report from one laboratory.
Soil testing is used to facilitate fertilizer composition and dosage selection for land employed in both agricultural and horticultural industries.
Prepaid mail-in kits for soil and ground water testing are available to facilitate the packaging and delivery of samples to a laboratory. Similarly, in 2004, laboratories began providing fertilizer recommendations along with the soil composition report.
Lab tests are more accurate and often utilize very precise flow injection technology (or Near InfraRed (NIR) scanning[5][6]). In addition, lab tests frequently include professional interpretation of results and recommendations. Always refer to all proviso statements included in a lab report as they may outline any anomalies, exceptions, and shortcomings in the sampling and/or analytical process/results.
Some laboratories analyze for all 13 mineral nutrients and a dozen non-essential, potentially toxic minerals utilizing the "universal soil extractant" (ammonium bicarbonate DTPA).[7]For a soil-testing program to be effective, besides proper soil-test calibration and laboratory quality control, soil samples should be collected in a cost-effective manner and should accurately represent the nutrient levels in the area of interest. Sampling is a critical component of the soil-testing process because it usually represents the largest single source of error in soil testing. Many factors varying both spatially and temporally influence nutrient concentrations in soils. Sampling protocols must account for the great diversity in magnitude, structure, and spatial scale of nutrient variability present in agricultural fields and other ecosystems.Soil nutrient variability within a crop field may be due to soil formation or management factors. Factors such as landscape position and soil parent material can cause great changes in soil texture, organic matter, drainage, and other properties. These properties affect nutrient levels directly through their influence on the amount of plant-available nutrient or indirectly though crop yield potential and, thus, the nutrient removal by crops. Variability caused by long-term history of management and land-use practices overlays that associated with soil-formation factors. The cumulative effects of nonuniform manure or fertilizer application are sources of potentially high soil-test variability. Proximity to livestock confinement areas, feed storage areas, and field boundaries are additional examples of historical factors that cause great variability in many fields. Small-scale variability usually predominates in fields with long histories of cropping and fertilizer or manure applications, especially when nutrients are applied using band methods. The challenge in these situations is to determine effective methods to delineate sampling areas within a field and the number of cores or borings needed for each composite sample to account for small-scale variability appropriately.
Reasons for Soil Testing
Soil testing measures the soil's nutrient-holding capacity and provides a basis for sound land management decisions. The lime and fertilizer recommendations on the soil test report are made based on the yields desired, nutrient sufficiency levels and desired pH.
Without soil testing, managing crop nutrients is difficult due to the complex nature of their interactions with the soil. Acid soils, for example, can limit root growth and cause certain nutrients to become unavailable to plants or others to become more available at toxic levels. Unless soil acidity is corrected through liming, applying fertilizer may not achieve the desired result.
Types of Soil Tests
Noble Research Institute soils and crops consultants make all fertilizer and lime recommendations by taking into account local conditions and producer goals. Routine soil samples are analyzed for soil pH, lime requirement, nitrate nitrogen, phosphorus, potassium, calcium, magnesium, sodium, soluble salts, organic matter and calculated CEC. Other analyses are available on request.
A Strategy for Collecting Samples
Improperly collected soil samples are the weak link in the soil testing process. For test results to be useful, the sample must accurately reflect the variability and conditions in the field. A sample from a single spot cannot achieve this.
Before sampling, make a detailed map of your land. For small areas, simply draw a diagram. For large tracts, aerial photographs may be helpful.
Divide the map into individual sample areas of 40 acres or less. Assign a short, permanent sample identification name to each area that will help you remember its location.
Each sample area should consist of only one general soil type or condition. If a field varies in slope, color, drainage or texture, and if those areas can be fertilized separately, submit a separate sample for each area (Fig. 1).
If the field being sampled has been divided into sections for various crops, submit a sample for each section – even if you now plan to grow the same crop across the entire field. Areas where liming or fertilizing patterns have differed from the rest of the field should also be sampled separately. Sample problem areas separately.
When to Collect Samples
Collect and submit samples any time you can. Try to sample at the same time of year each time you sample, though, since analyses can vary depending on when samples are taken.
In most cases, it is not necessary to take soil samples every year. Usually, once every two or three years is adequate. If you are interested in carryover nitrogen analysis, this should be done annually since these levels are dynamic.

How to Collect Routine Samples
Essential tools for collecting soil samples include a plastic bucket and a shovel or a soil probe. Do not use brass, bronze or galvanized tools because they can contaminate samples with metals.
Clean the bucket and tools before collecting samples to prevent small amounts of lime and fertilizer residue from contaminating the sample and distorting test results.
- Soil Testing Probe Information
- Soil Sampling Pan Instructions and Diagram
Collect samples from a depth of 0 to 6 inches. If you want to collect subsoil samples as well (useful for carryover nitrogen analysis), collect an additional sample from 6 to 12 inches.
Collect soil cores with a probe at 15 to 20 random locations across a field (Fig. 1). Zigzag patterns help ensure that samples accurately reflect overall field conditions and variability. Although a soil probe is ideal, cores can be collected with a shovel as follows: remove soil forming a small hole, cut a 1-inch thick cross-section of soil from the wall of the hole to the proper sample depth, and carefully place the soil in the bucket. For additional information on collecting a soil sample, view the How to Take a Soil Sample video.
To ensure a representative sample, avoid taking cores from small areas where soil conditions differ substantially from those in the rest of the field – for example, wet spots, severely eroded areas, old building sites, fence rows, spoil banks, burn-row areas, and old woodpile or fire sites. Cores from these spots can adversely influence soil test results and recommendations.
y mix at least 15 cores in a clean plastic bucket. From this mixture, send in about 1 pint for analysis. Provide all information requested on the Soil Sample Entry Form. Bags and forms are available on request.
Packaging and Mailing Information
Soil Sample Entry Form
Use ink when filling out the information sheet(s) and labeling soil sample bag(s). Use the appropriate sample ID from your field map. Sample bags are easier to label before they are filled.
Complete all appropriate blanks on the information sheet(s) and write legibly. Be consistent from year to year in how you list your name, farm name and/or address. List the crops you intend to grow. Also, check to make sure that the sample ID on the form corresponds to the one on the soil sample bag and on the farm map. Testing takes about seven to 10 working days to complete from the time we receive your shipment.
Place information sheets inside the shipping container with the samples and keep a copy for your records. It is a good idea to place information sheets inside a sealed plastic bag to keep them clean and legible. However, never use a plastic bag to transport and ship samples.
Do not send cash or check. When you receive your test results, you will receive an invoice from our contract laboratory for testing analysis. Servi-Tech Lab testing cost information is located in the Test Analysis Pricing document.